
Learn how to make an easy vanilla crème brûlée with just 4 ingredients! This beginner-friendly recipe delivers a creamy custard and crispy caramel top – no torch needed. Perfect for any occasion!
Discover this foolproof easy creme brulee recipe that’s perfect for beginners! Made with just 4 simple ingredients, this classic vanilla crème brûlée features a silky smooth custard base and a crispy caramelized sugar topping. Whether you’re impressing guests at a dinner party or treating yourself to a luxurious dessert, this homemade version beats restaurant quality every time. No fancy equipment required—I’ll show you how to make crème brûlée without a torch using your oven’s broiler. This recipe has been tested dozens of times in my kitchen for that perfect crackle and creamy texture.
Why make your own vanilla crème brûlée at home? It’s surprisingly straightforward, cost-effective (under $10 for 4 servings), and customizable. Plus, the satisfaction of cracking through that golden caramel layer is unbeatable! If you’ve ever hesitated because it seems intimidating, trust me—this 4 ingredient crème brûlée is beginner-friendly and always turns out restaurant-worthy. Pair it with fresh berries for a refreshing twist or enjoy it plain for pure indulgence.
Why you will love this recipe
- Beginner-Friendly: Step-by-step instructions make it simple, even if you’ve never baked custard before.
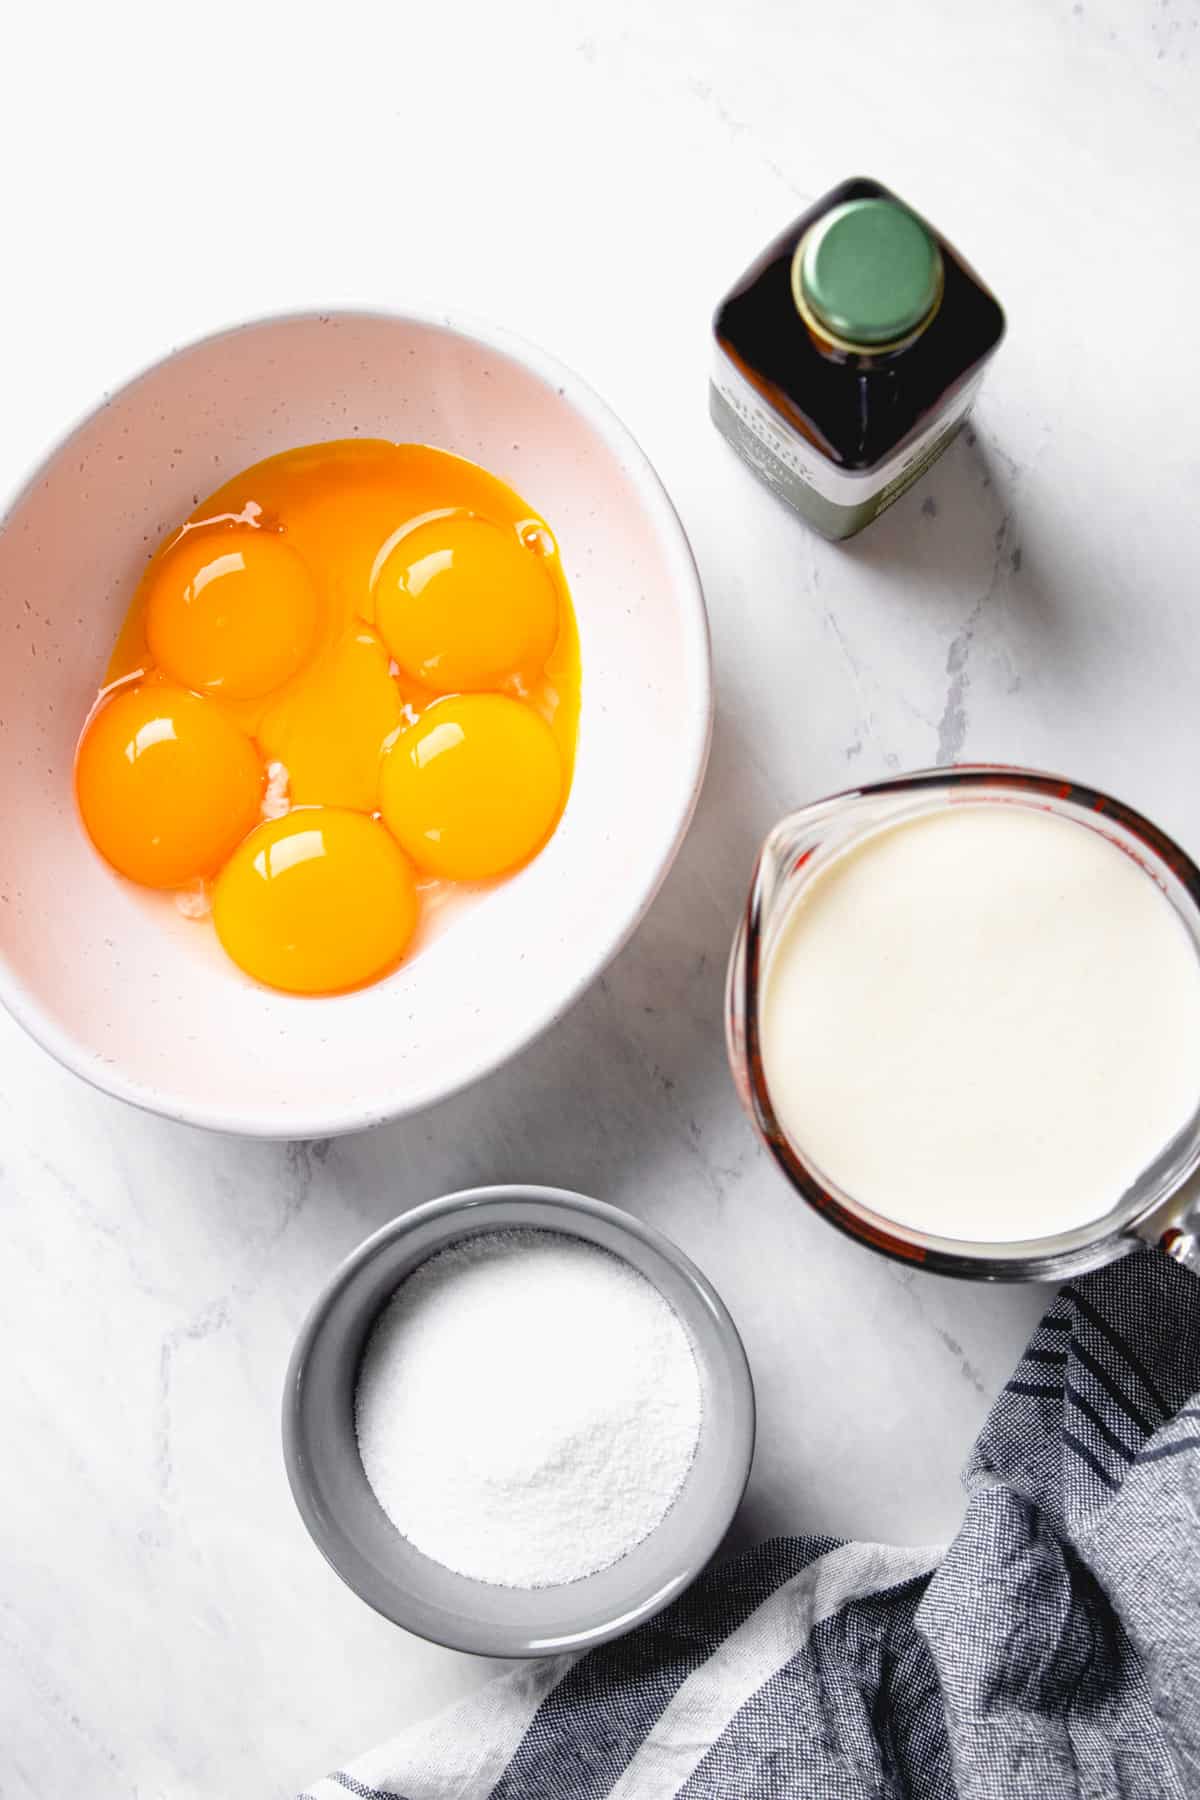
- Minimal Ingredients: Just 4 pantry staples—heavy cream, egg yolks, sugar, and vanilla—for maximum flavor.
- Make-Ahead: Prep up to 2 days in advance, ideal for holidays or special occasions like Valentine’s Day.
- No Torch Required: Use the broiler method for that signature crispy top without extra gadgets.
How to make it
1. Preheat and prep.
Preheat your oven to 325°F. Bring a kettle or pot of water to a boil for the water bath. This ensures even cooking for that creamy texture in your vanilla crème brûlée.
2. Heat the cream.
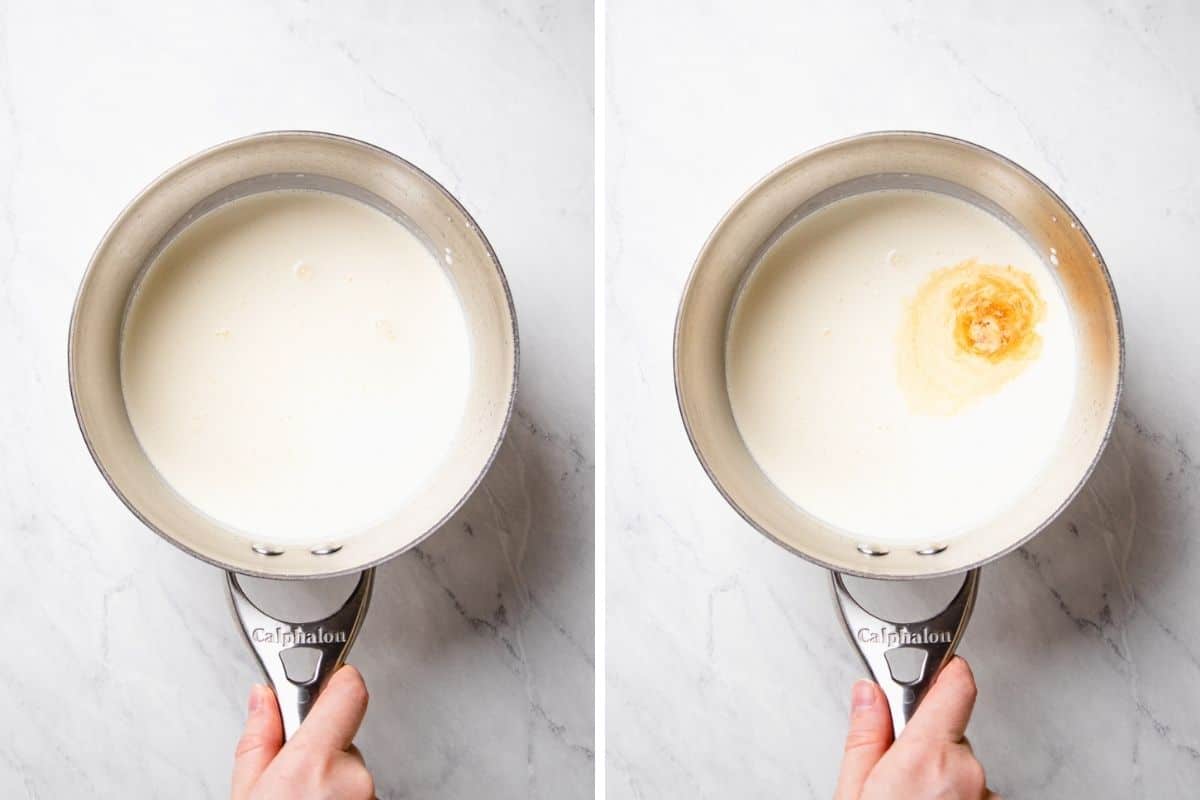
In a saucepan over medium heat, combine 2 cups heavy cream and 1 teaspoon vanilla extract. Heat until it just starts to simmer (small bubbles around the edges)—do not boil. Remove from heat and set aside to infuse for 5 minutes.
3. Whisk the eggs.
In a medium bowl, whisk together 6 egg yolks and ⅓ cup granulated sugar until the mixture thickens and turns pale yellow (about 3-5 minutes with a hand whisk or electric mixer on low). This step is key to a smooth custard.
4. Temper the mixture.
Gradually pour the warm cream into the egg mixture in a slow stream, whisking constantly to prevent curdling. This tempering technique ensures your easy crème brûlée stays silky. Strain through a fine-mesh sieve if needed to remove any lumps.

5. Prepare the ramekins.
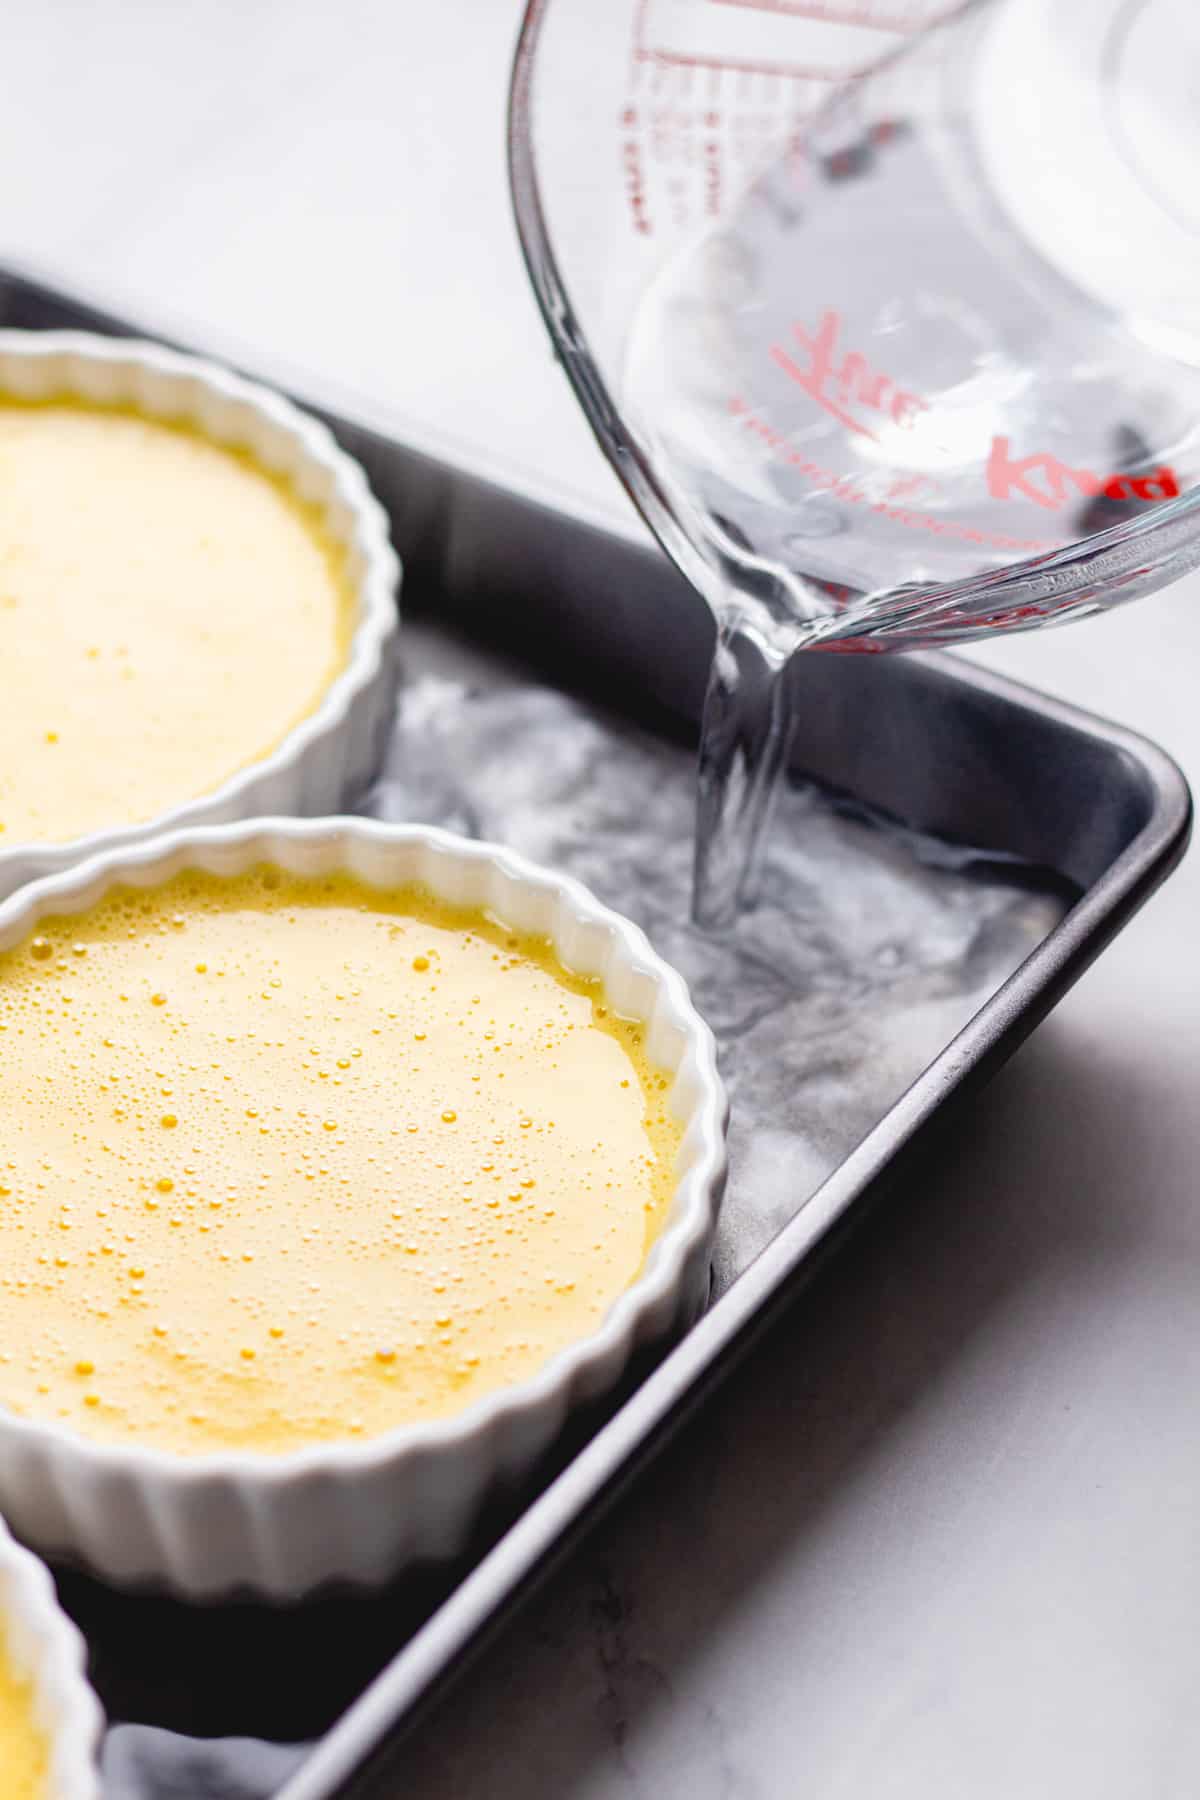
Divide the custard evenly among 4 shallow ramekins (6-8 oz each). Place them in a large baking dish. Carefully pour the boiling water into the dish until it reaches about ¾ up the sides of the ramekins—creating a water bath for gentle baking.
6. Bake the custard.
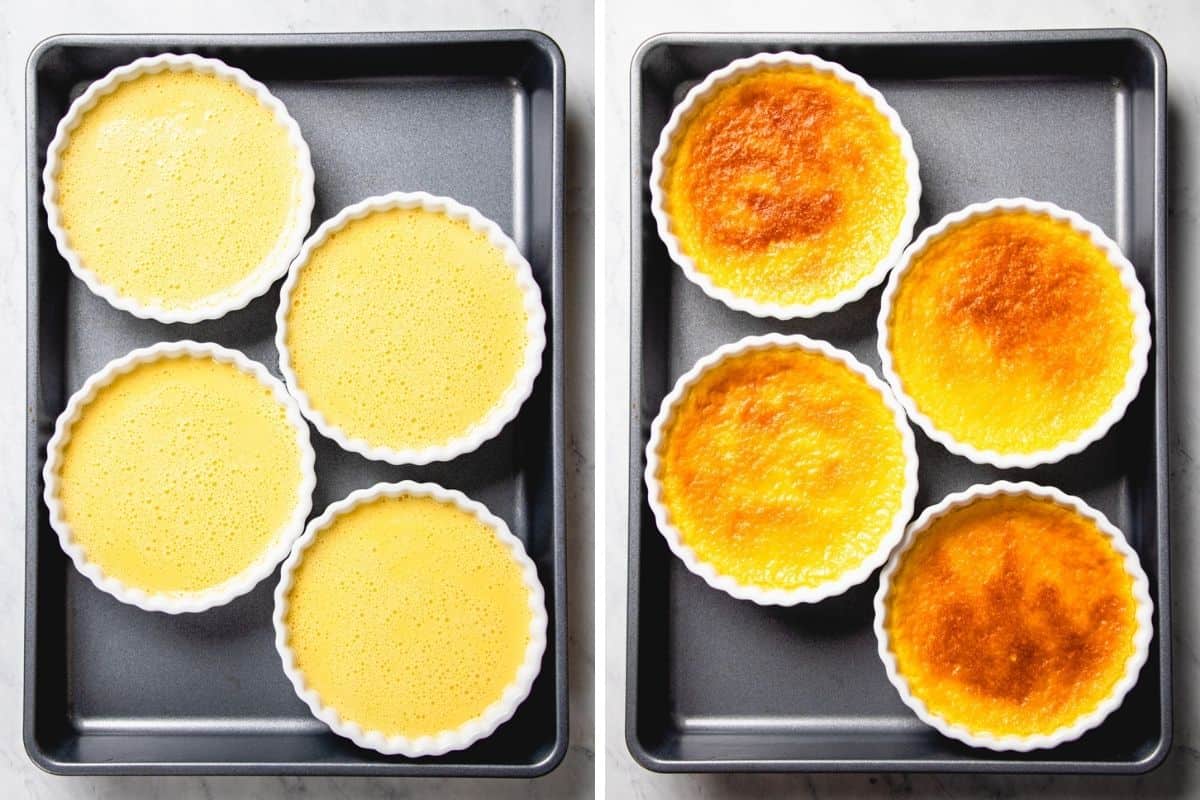
Bake at 325F for 30-35 minutes until the edges are set but the center still jiggles slightly (like Jell-O). Avoid overbaking to keep it creamy. Remove from the oven and water bath, let cool to room temperature, then cover with plastic wrap and refrigerate for at least 4 hours (or overnight for best results).
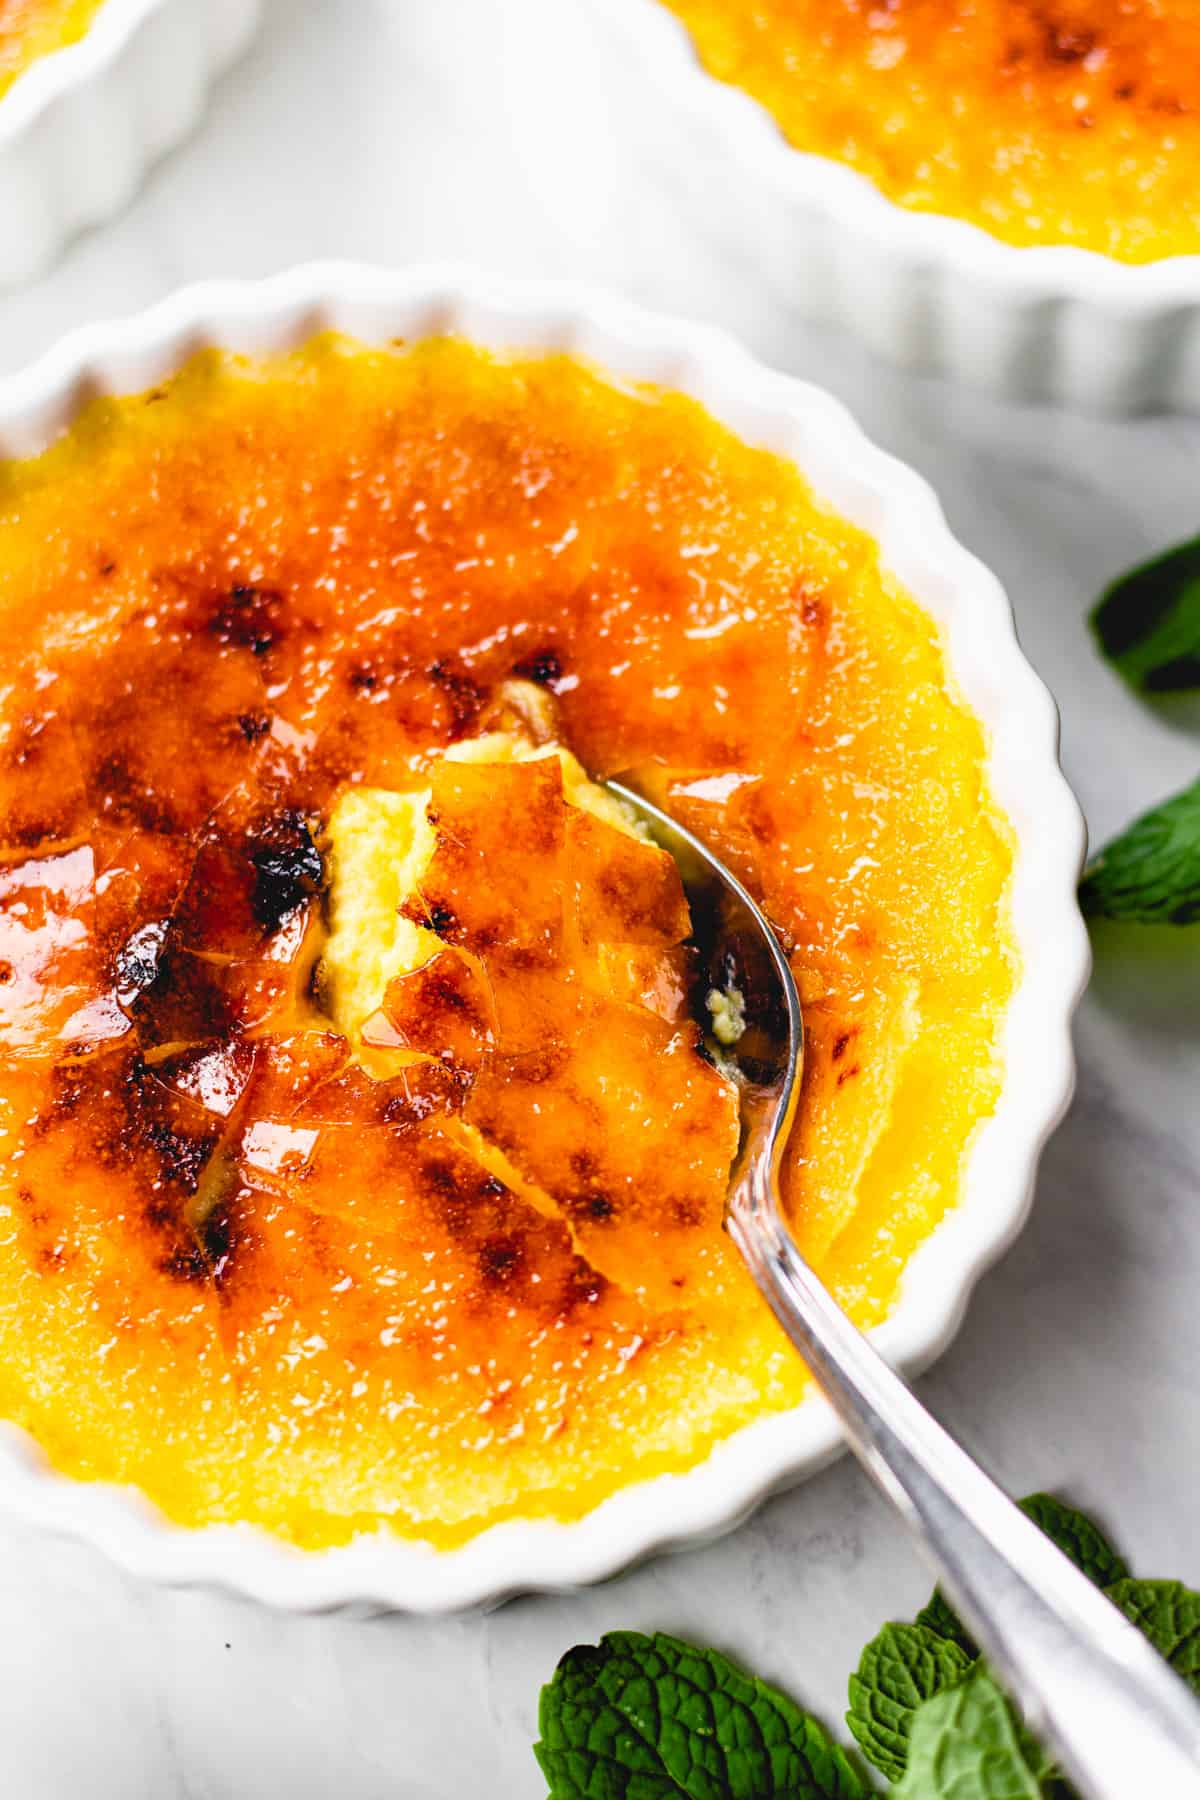
7. Caramelize the top.
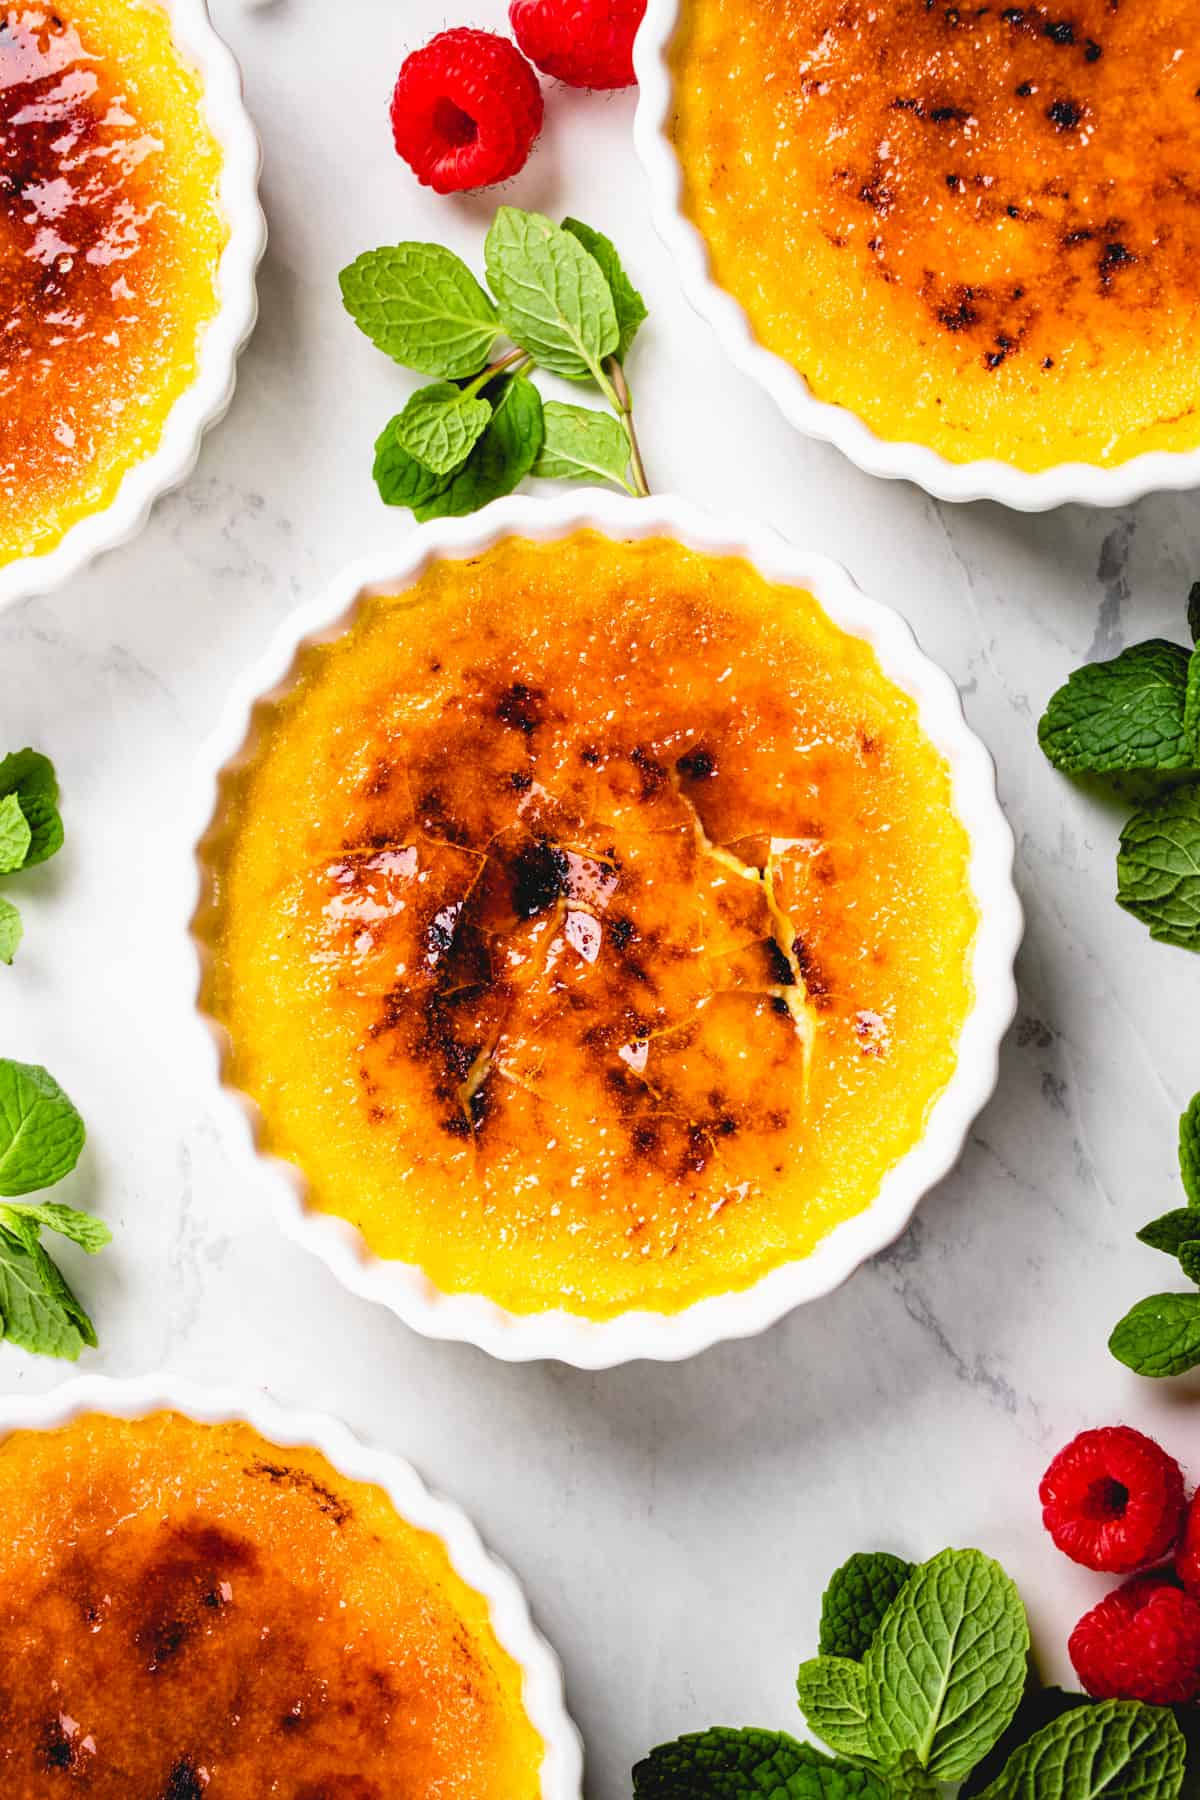
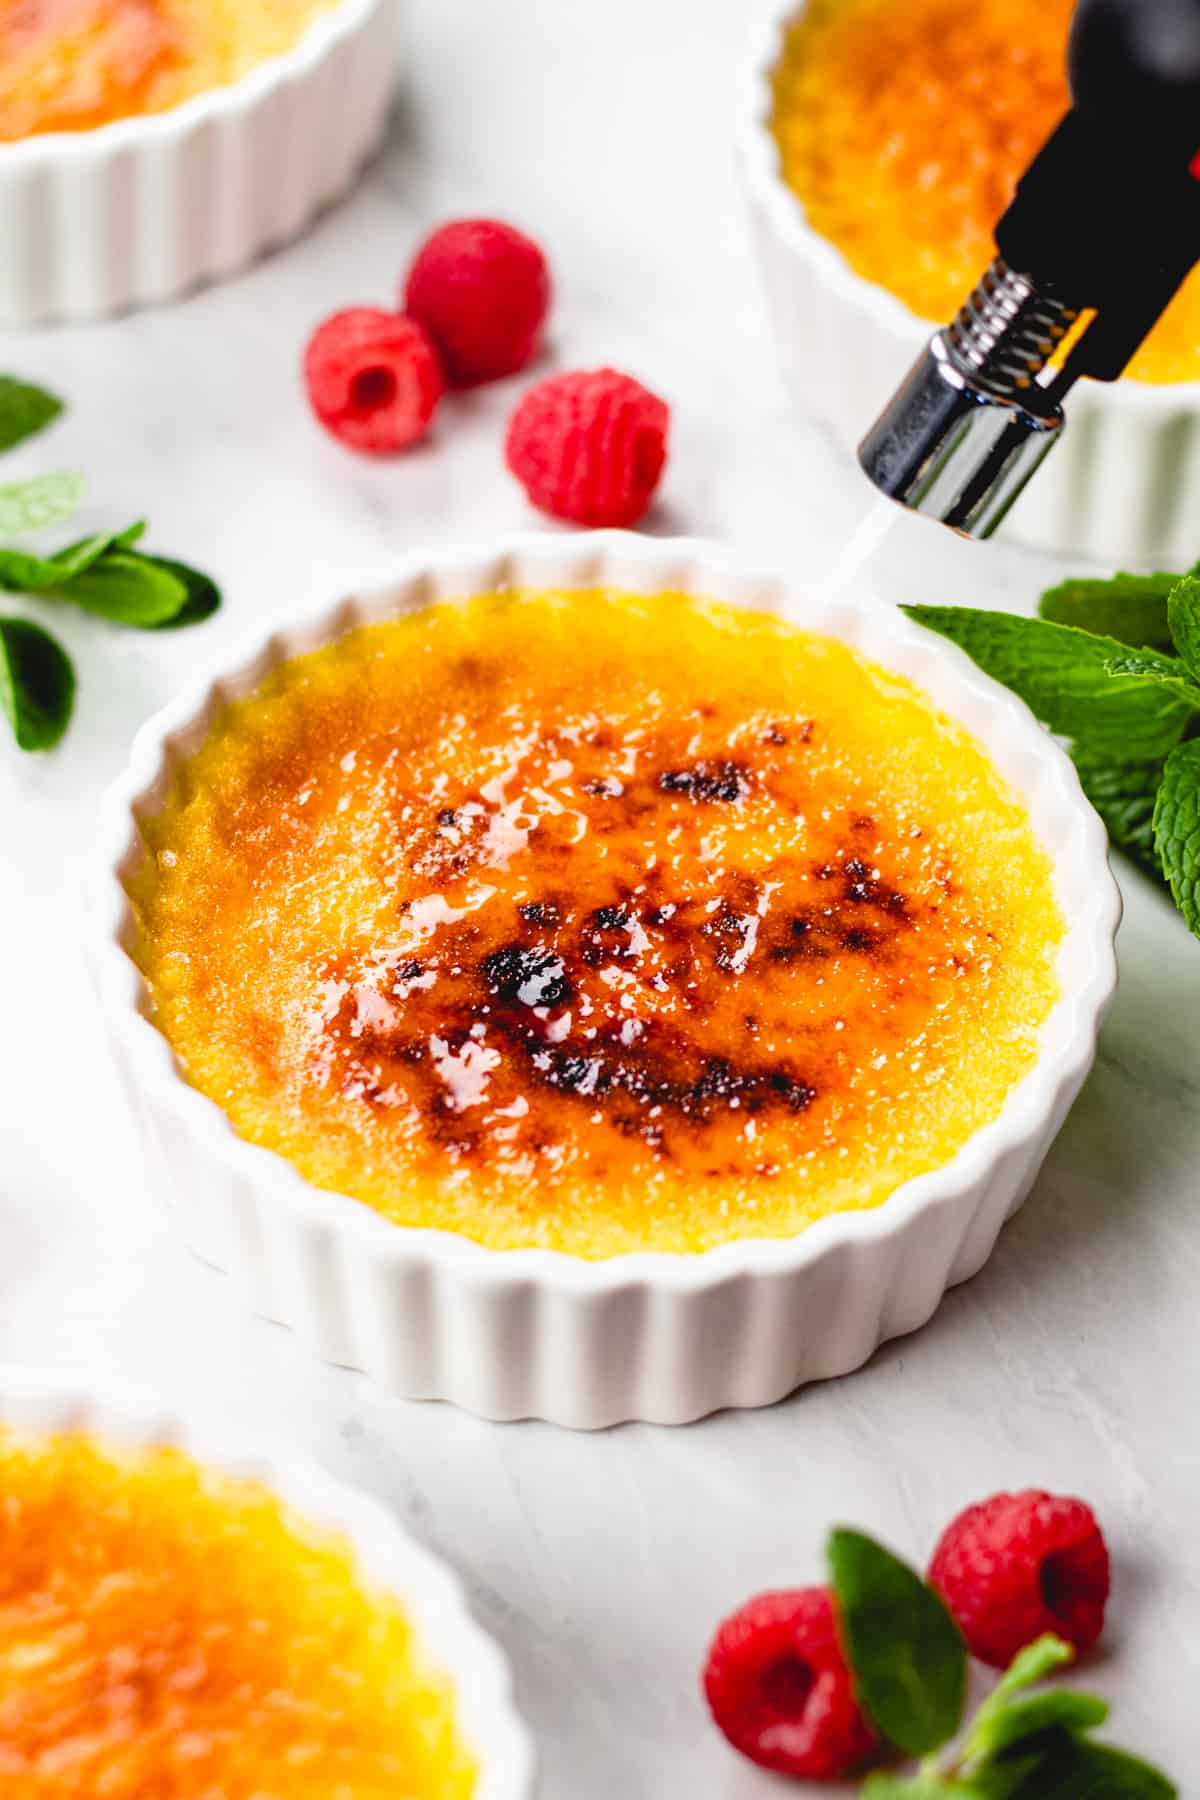
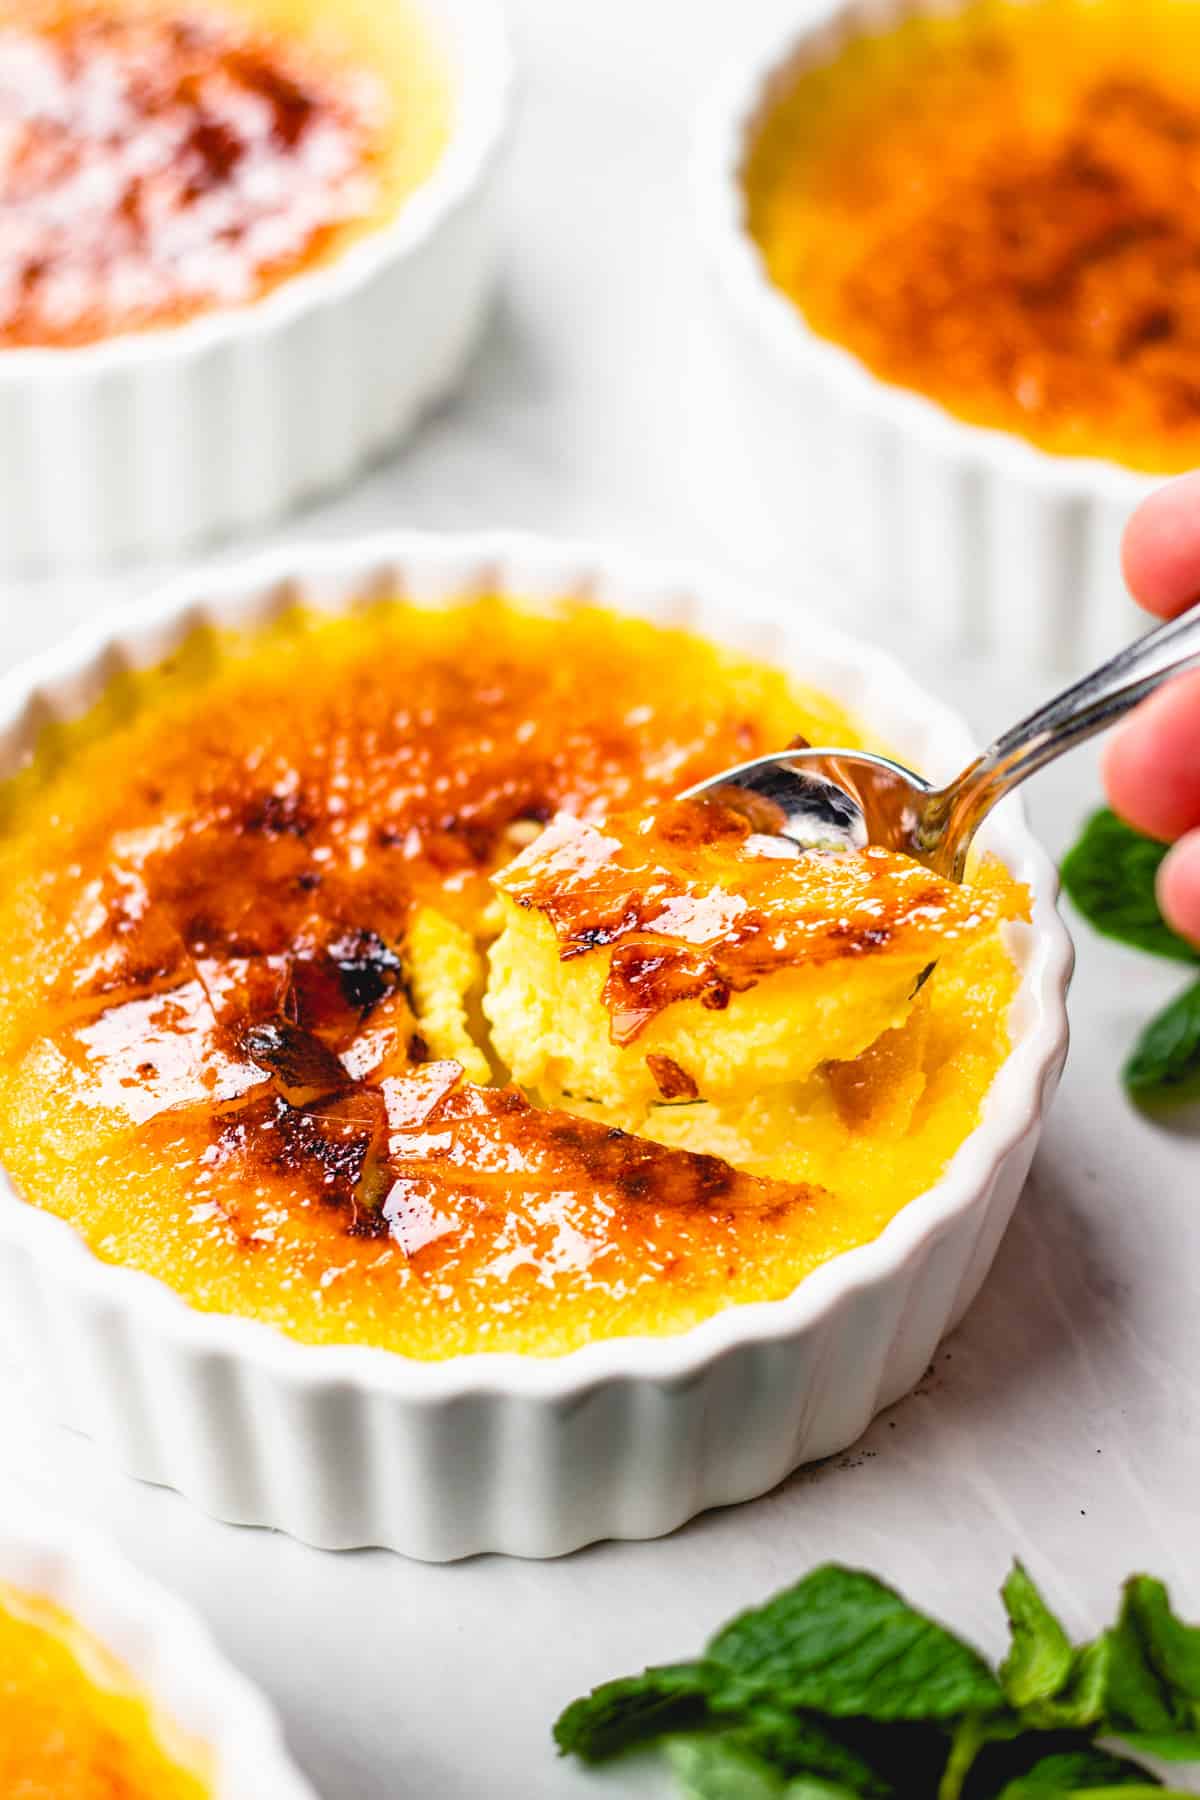
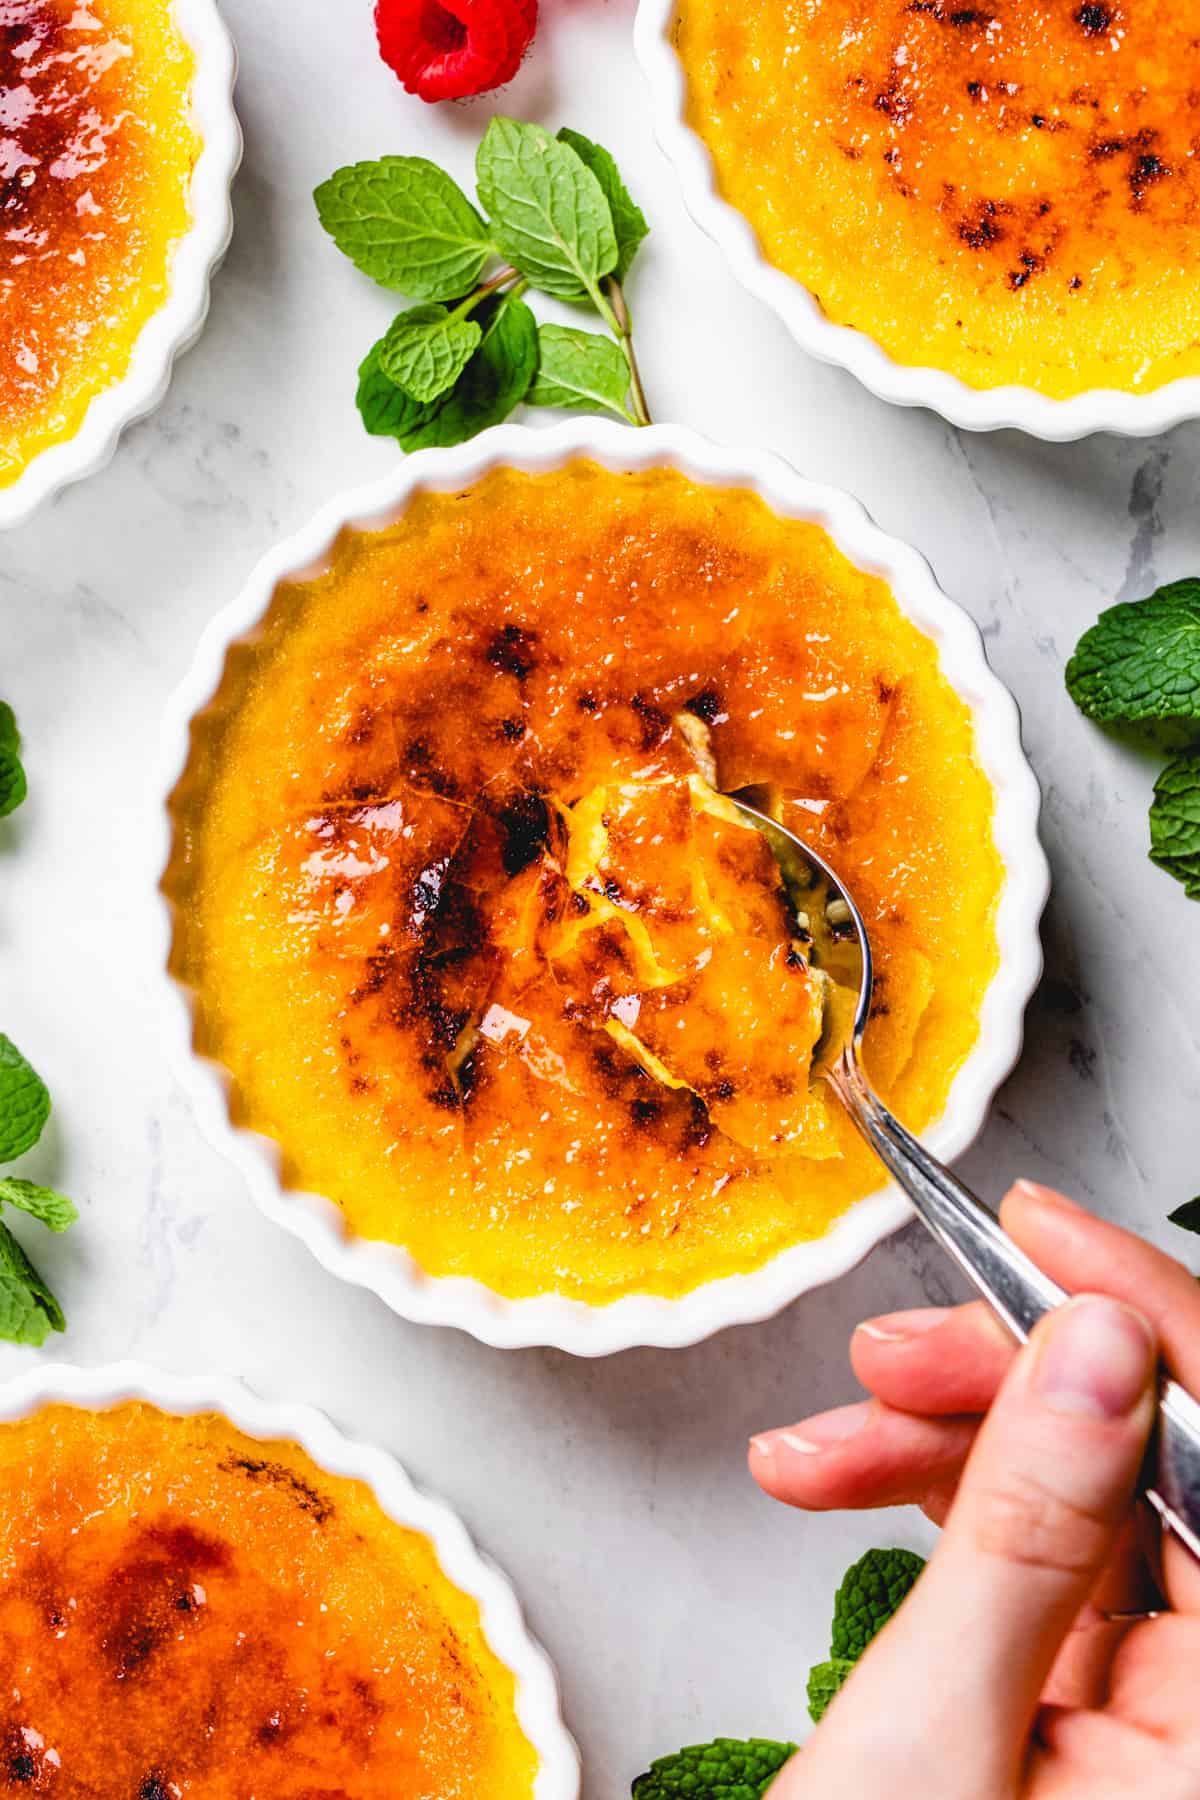
Before serving, sprinkle 1 tablespoon granulated sugar evenly over each chilled custard. Use a kitchen torch to melt and caramelize the sugar until golden and bubbly. No torch? Place under your oven’s broiler on high for 1-2 minutes, watching closely to avoid burning. Let sit for 1 minute to harden into a crispy shell.
Serve immediately for that satisfying crack. Top with berries if desired.
Tips for best results
- Tempering is Crucial: Add the hot cream slowly while whisking to avoid scrambled eggs—patience pays off in this beginner crème brûlée recipe.
- Vanilla Upgrade: For gourmet flair, scrape seeds from a vanilla bean instead of extract. It elevates the flavor without complicating the 4 ingredient base.
- Ramekin Choice: Opt for shallow, wide ramekins (like 4-6 oz) for even cooking and more caramel surface area. Deep ones may need extra bake time.
- Water bath. This is another important step. Water bath helps to create moist environment while baking. Which helps with more even cooking.
- Baking time. It’s always hard to say exact baking time. It depends on many factors, including the size of the ramekins and how deep they are. The most important key for perfect baking is to make sure that the edges are set and the center is slightly jiggly. You also can check the internal temperature, which should be at 170˚F.
- Make It Torch-Free Every Time: The broiler method works great, but rotate ramekins for even browning. Keep them cold before broiling to avoid melting the custard.
Frequently Asked Questions
Yes! After it’s cooled off, it has to be refrigerated for at least 4 hours or overnight. This way it will perfectly set and bind all the flavors together.
When the custard is done, the edges should be set and the center is should look set and still wobble when you gently shake it. When you scoop it out, it should have a thick yogurt consistency. The easiest way to check if it’s done is to use a thermometer. The internal temperature should be 170˚F.
I always prefer to use shallow ramekins, not deeper than 1 ½-2 inches or 4-6 oz. If you use deep ones, you have a good chance to undercook the custard and burn the tops.
Use your oven’s broiler—sprinkle sugar and broil on high for 1-2 minutes. Watch closely!
Yes, prepare the custard up to 2 days in advance and caramelize just before serving.
It may need longer baking or chilling. Test doneness with a gentle jiggle.
Strain the mixture before baking and temper eggs more gradually next time.
Granulated works fine, but superfine sugar melts faster.
MORE DESSERT RECIPES YOU MIGHT LIKE:
- Orange Pound Cake
- Chocolate Mousse Pie
- Mini Cheesecakes with Blueberry Sauce
- Chocolate Bourbon Truffles
- Classic Apple Pie
- Blueberry Hand Pies
- Lemon Blueberry Bundt Cake
- Chocolate Cupcakes with Caramel Filling
- 3 Ingredient Coconut Truffle
- Julia Child’s Chocolate Mousse
- Italian Tiramisu Recipe
- Chocolate Cake from Scratch

Easy Vanilla Crème Brûlée Recipe
Ingredients
- 2 cups heavy cream
- 1 teaspoon vanilla extract
- 6 egg yolks
- ⅓ cup granulated sugar
- 4 tablespoons granulated sugar for topping
- 1 kettle of hot water
Instructions
- Preheat your oven to 325°F. Bring a kettle or pot of water to a boil for the water bath. This ensures even cooking for that creamy texture in your vanilla crème brûlée.
- In a saucepan over medium heat, combine 2 cups heavy cream and 1 teaspoon vanilla extract. Heat until it just starts to simmer (small bubbles around the edges)—do not boil. Remove from heat and set aside to infuse for 5 minutes.
- In a medium bowl, whisk together 6 egg yolks and ⅓ cup granulated sugar until the mixture thickens and turns pale yellow (about 3-5 minutes with a hand whisk or electric mixer on low). This step is key to a smooth custard.
- Gradually pour the warm cream into the egg mixture in a slow stream, whisking constantly to prevent curdling. This tempering technique ensures your easy crème brûlée stays silky. Strain through a fine-mesh sieve if needed to remove any lumps.
- Divide the custard evenly among 4 shallow ramekins (6-8 oz each). Place them in a large baking dish. Carefully pour the boiling water into the dish until it reaches about ¾ up the sides of the ramekins—creating a water bath for gentle baking.
- Bake at 325F for 30-35 minutes until the edges are set but the center still jiggles slightly (like Jell-O). Avoid overbaking to keep it creamy. Remove from the oven and water bath, let cool to room temperature, then cover with plastic wrap and refrigerate for at least 4 hours (or overnight for best results).
- Before serving, sprinkle 1 tablespoon granulated sugar evenly over each chilled custard. Use a kitchen torch to melt and caramelize the sugar until golden and bubbly. No torch? Place under your oven's broiler on high for 1-2 minutes, watching closely to avoid burning. Let sit for 1 minute to harden into a crispy shell.
- Serve immediately for that satisfying crack. Top with berries if desired.
Notes
- Tempering is Crucial: Add the hot cream slowly while whisking to avoid scrambled eggs—patience pays off in this beginner crème brûlée recipe.
- Vanilla Upgrade: For gourmet flair, scrape seeds from a vanilla bean instead of extract. It elevates the flavor without complicating the 4 ingredient base.
- Ramekin Choice: Opt for shallow, wide ramekins (like 4-6 oz) for even cooking and more caramel surface area. Deep ones may need extra bake time.
- Water bath. This is another important step. Water bath helps to create moist environment while baking. Which helps with more even cooking.
- Baking time. It’s always hard to say exact baking time. It depends on many factors, including the size of the ramekins and how deep they are. The most important key for perfect baking is to make sure that the edges are set and the center is slightly jiggly. You also can check the internal temperature, which should be at 170˚F.
- Make It Torch-Free Every Time: The broiler method works great, but rotate ramekins for even browning. Keep them cold before broiling to avoid melting the custard.
I made this for the first time, and to say I was nervous about it is an understatement. It turned out perfectly! The instructions were easy to follow and it’s easier to make than I expected it to be. Thank you!
Delish!
Thank you, Carol!
I used smaller ramekins I ended up with 7 going to cook for less time I hope I don’t overcook!
My husband and I love this Crème Brulée! I just whipped up some in shallow ramekins and made 8 it’s perfect. ( I usually use 6 deep ramekins) I like the shallow ramekins best. Happy Valentine’s Day everyone.
Can I make these ahead of time and store in the refrigerator?
Hi Amanda, you can make creme brulee a day before and make the caramelized topping before ready to serve.